How to Create an Inspection Template in Sanarp?
Any paper-based checklist can be converted into online checklist easily. To do, follow the below steps-
Step1: Log in to www.sanarp.com
Step2: Navigate to Inspection from Menu. Click on Templates -> Create Template.
Step3: Fill the details
- Inspection Template Name field – write Template name
- Description and write a brief description of the template.
- Overall Result – This field is optional. In overall result, you can field such as Department, or any field which can be used for filter.
- Available for public – This field control the accessibility of Inspection Template to the guest and staff. To make the Template available to public, Select Yes. If you need to restrict the template accessibility to staff only, then select No (Refer Image1)
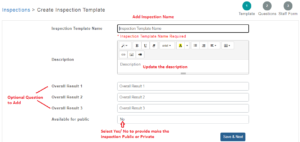 Image1
Step4: Then, click on the Save & Next button.
To start creation, Section Header should be added first and then Inspection Question
Step5: In the Section Header, write the section header name.
Step6: Now add Inspection Question by writing the question. Refer Image2
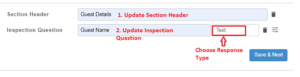 Image2
Step7: Choose “Response Type” from the drop-down for the inspection question.
- Text
- Number
- Yes/ No
- Signature
- Date
- Image
- Multiple Choice
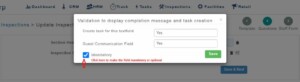
For the Response Type, you can put Smart Logic. To put Smart Logic, click on the Filter button near the Delete button, and a pop-up will appear.
- To make this inspection question optional, unchecked the mandatory tick mark. If you want to keep the question as mandatory, then select the checkbox.
 For Yes/ No Response Type – 1) On the text box Message if Yes – put the message you want to display if YES is selected. 2) On the text box Message if No – put the message you want to display if NO is selected. 3) On the text box Create Task if – select Yes/No to create task when condition is met.(Refer Image3)
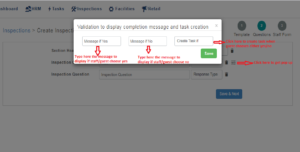 Image3
- For Number Response Type – 1) On the text box Select Condition – select the condition (For Eg. Greater Than or Equal To) 2) On the text box Value – put the value for which you need to define the condition. 3) On the text box Message if TRUE– put the message you want to display if TRUE is selected. 4) On the text box Message if FALSE– put the message you want to display if FALSE is selected. 5) On the text box Create Task if – select TRUE/ FALSE to create a task when TRUE or FALSE is met. (Refer Image4)
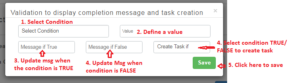 Image4
- To add multiple choice option (Refer Image5)
1) To add multiple option answers, Select the response type as “Multiple Choice”.
2) Click on the three dotted lines to add the options.
3) Add the options/ answers and click Save button.
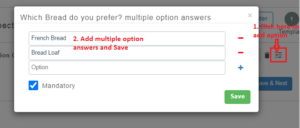 Image5
Step8: To add more Questions, click on “+Question” at the bottom right corner. You can also define the number of questions to be added while adding.
Step9: To add the next Section Header, click on “+Section”.
Step10: To delete an Inspection Question or Section Header, Click on the Delete button (Refer Image6)
Step10: Click on the Save & Next button to proceed to the next page.
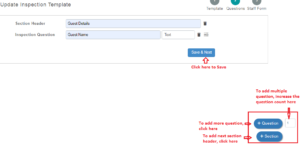 Image6
To add Staff Section (Refer Image7)
Step11: To add Staff Section, click on “+Section”. To add Questions, click on “+Question”.
If you don’t need to add the Staff Section, click on the Skip button.
Step11: Click on the Save & Next button to complete the template creation.
 Image7